
Location guides · 2026-10-07 · 2828 words
Sewer Map Design Guide: Channels, Access, and Loops
A detailed guide to build a sewer that supports pursuit and exploration, with a worked example, settings, export checks, and practical table tests.
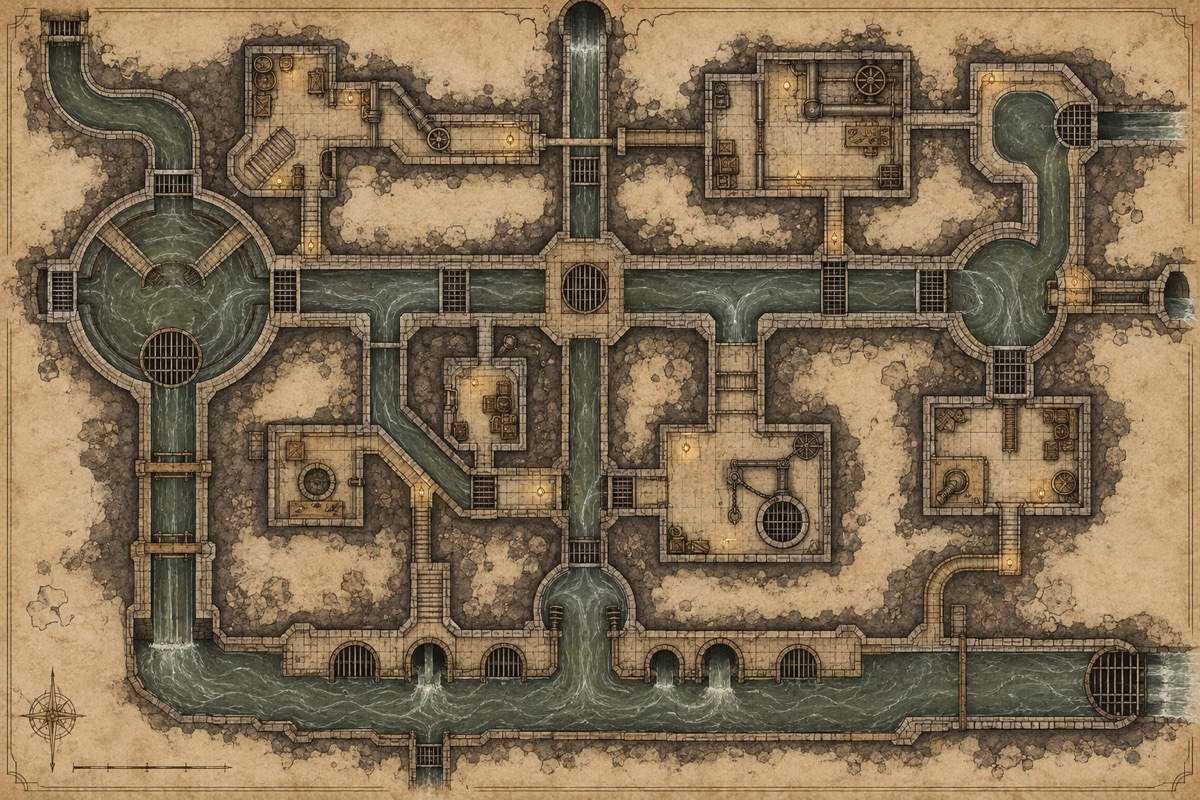
Define the job of the map
A useful sewer map generator starts with decisions at the table, not with decoration. Treat water flow and maintenance access as the structure of the map. This guide uses a drainage network beneath a dense market as a running example so each recommendation can be tested against an actual location. You will see how to choose a scope, connect spaces, make the layout readable, and produce an export that remains useful when the session begins.
An rpg map generator can produce branching tunnels, while drainage logic gives those tunnels a believable direction and purpose. For a drainage network beneath a dense market, compare this advice with the practical route: a dry service route beside the channel.
The central question is what the map must help players decide. In a drainage network beneath a dense market, the map should show enough structure to understand where a route might lead, yet leave room for discovery. Treat water flow and maintenance access as the structure of the map. Write that purpose in one sentence before opening a generator. If a later room, corridor, or icon does not support that sentence, ask whether it belongs on this particular sheet.
A sewer map generator is useful when it communicates relationships: which spaces connect, which are separated, where people normally travel, and where trouble might interrupt that travel. The sample location calls for storm inlet, inspection chamber, junction, overflow vault, and outlet. These are functions, not mandatory labels. Change their names to fit your adventure, but preserve the logic that explains why each space sits where it does. A clear reason is more valuable than a large room count.
Field note: write the map's purpose at the top of your prep page. For a drainage network beneath a dense market, the sentence should explain why storm inlet, inspection chamber, junction, overflow vault, and outlet belong together. It becomes a useful filter when a generated chamber is attractive but has no role in the site.
Choose a scope that fits the session
Scope depends on how long the group will spend in the location. For a drainage network beneath a dense market, decide whether the whole site will be explored in one session or revisited over several. Count decisions rather than squares: each branch should offer information, risk, a reward, or a change in route. A short map with several distinct choices can occupy a table longer than a sprawling map of empty rooms.
Use an approximate room budget before generating. Allocate one space for arrival, a few for development, an optional detour, and a destination. The example's essential areas are storm inlet, inspection chamber, junction, overflow vault, and outlet. Leave breathing space between major moments. If you need a larger site, add a second map or level with a different purpose instead of stretching every corridor merely to fill the canvas.
Time check: count the scenes you expect to play in a drainage network beneath a dense market, then leave room for one unplanned detour. If the location has more developed rooms than your available session can support, mark which branch may be shortened without removing the finale.
Start with a believable spatial idea
Imagine how this place was built and used before it became an adventure. A drainage network beneath a dense market implies routes for ordinary occupants as well as visitors. Trace a normal day: where would someone enter, store supplies, work, gather, and leave? Put doors and passages along those paths. The result feels more convincing because the geometry explains behavior, not because every wall has a detailed texture. When preparing a drainage network beneath a dense market, test the idea against the actual functions: storm inlet, inspection chamber, junction, overflow vault, and outlet.
The spatial idea can be simple: a dry service route beside the channel. This gives you a starting network with a reason to exist. Draw the broad connections first, then place storm inlet, inspection chamber, junction, overflow vault, and outlet. Keep dimensions approximate until movement works. At this stage you are solving a diagram, so avoid polishing line weight, color, or furniture. Those details are easier to judge once the main route is stable.
Give the water a direction and a destination. Storm inlets lead toward larger channels; overflow space appears where water might collect; maintenance rooms sit where workers need access. The resulting branches feel engineered rather than random. In the running example, a marked junction with three water levels gives that decision a visible reference point.
Reality check: trace how an ordinary occupant would travel between storm inlet, inspection chamber, junction, overflow vault, and outlet. A corridor that only exists to connect two generated shapes is easy to spot when no worker, resident, or visitor would choose it.
Build routes and choices
A good route should support a choice that players can understand. In the example, a dry service route beside the channel. Ask what is visible at the decision point and what each direction seems to promise. One way may be safer but longer; another may be quicker yet exposed. The map does not need to reveal every consequence immediately, but it should provide enough clues that choosing feels intentional.
Loops are especially useful because they let players return with new knowledge, flank an obstacle, or retreat without simply reversing every step. Add a loop where it fits the location's original use. Avoid making every passage interchangeable. If two corridors connect the same rooms and offer the same sights, hazards, and travel time, either distinguish them or remove one. Readability improves when every connection earns its place. In the running example, a marked junction with three water levels gives that decision a visible reference point.
Route check: follow a dry service route beside the channel with a pencil from both directions. If the second path changes nothing about access, information, or risk, reshape it until the alternative has a reason to be chosen.
Natural water movement in Cave Map Design Guide: Natural Routes and Chambers offers a contrast to engineered drainage. Maintenance access can be compared with the working routes in Mine Map Design Guide: Workings and Hidden Risks.
Give important rooms a role
Room functions help you improvise. For a drainage network beneath a dense market, start with storm inlet, inspection chamber, junction, overflow vault, and outlet. Give each important space one job in the building and one job in the adventure. A store can explain supplies while hiding a clue; a hall can provide orientation while becoming a confrontation site. This double duty makes the map feel dense with possibility without requiring dozens of chambers.
Not every room needs a fight or puzzle. A quiet chamber can establish history, show a consequence of an earlier event, or provide a place to regroup. Number rooms in your notes so you can find them quickly. If you rename a generated room, keep the number stable across your map and prep document. Consistent references prevent confusion when the group moves quickly or unexpectedly. For a drainage network beneath a dense market, compare this advice with the practical route: a dry service route beside the channel.
Room check: read the function of each chamber aloud without its number. If two spaces in a drainage network beneath a dense market sound identical, combine them or give one a different job. This keeps notes short and descriptions memorable.
Use landmarks and visual language
Landmarks reduce navigation friction. In this guide's example, a marked junction with three water levels. It should appear in descriptions before the party reaches it, or be visible from multiple approaches. A landmark can be a large room, odd shape, stair, stream, statue, or opening to another level. The key is distinctiveness: players should be able to say where they are relative to it.
Use a restrained visual language. Make walls, floor, doors, hidden features, hazards, and exits distinguishable at the size the map will actually be displayed. A small legend is better than a crowded set of ornate symbols. If the map is shared with players, hide information they have not discovered or create a separate player version. Clarity matters more than mimicking the style of a published product. When preparing a drainage network beneath a dense market, test the idea against the actual functions: storm inlet, inspection chamber, junction, overflow vault, and outlet.
Landmark check: point to a marked junction with three water levels on a zoomed-out export. If it disappears at the size your players will see, strengthen its shape or contrast rather than adding another label.
Add tension without blocking play
Tension works best when a hazard interacts with a choice. Random tunnels that do not suggest a drainage system is a warning sign: it consumes attention without adding useful play. Place a trap, locked route, or encounter where the group can notice clues, evaluate alternatives, and decide what to do. A hazard that appears without warning and blocks the only route is usually less interesting than one that changes the cost of a known option. When preparing a drainage network beneath a dense market, test the idea against the actual functions: storm inlet, inspection chamber, junction, overflow vault, and outlet.
Consider how the location responds to movement. Sound may travel through a dry service route beside the channel; a guarded space may overlook a marked junction with three water levels; an exit may be easy to reach but hard to use. Mark these relationships in short notes beside the map. They help you run the site consistently even when players act in an unexpected order. Keep essential progress possible without assuming a single solution.
Hazard check: test whether the risk can be recognized before it matters. In a drainage network beneath a dense market, avoid random tunnels that do not suggest a drainage system. Put evidence near a decision point and let players choose how to respond.
Make a worked example
For a worked example, sketch a drainage network beneath a dense market as a set of connected functions rather than a finished illustration. Begin with storm inlet, inspection chamber, junction, overflow vault, and outlet. Put the entrance where arrival makes sense, then choose a destination whose distance feels appropriate for the session. Add a dry service route beside the channel. Finally, place a marked junction with three water levels where it can help players orient themselves. You now have a playable graph even before choosing a theme.
Run three imaginary turns. First, the party enters and sees two plausible directions. Second, they explore an optional room and learn something that changes the meaning of the main route. Third, they approach the destination from either direction of the loop. If the choices sound indistinguishable, adjust one route. If the map requires a scripted sequence to work, loosen a connection or move a clue. In the running example, a marked junction with three water levels gives that decision a visible reference point.
Mark at least one dry route. A map where every passage is equally flooded offers less choice than one where players can trade speed, safety, and visibility between a walkway and a channel. For a drainage network beneath a dense market, compare this advice with the practical route: a dry service route beside the channel.
Example check: imagine a group entering a drainage network beneath a dense market after missing your planned clue. Can the map still support a route toward a marked junction with three water levels? If not, move a hint to a place that can be reached by more than one approach.
Translate the plan into generator settings
Open the relevant generator with a size that matches the room budget. For a drainage network beneath a dense market, generate a medium draft before trying a huge canvas. Set room count near the number of meaningful spaces you planned. Choose straight corridors for deliberate architecture or organic ones for excavated and natural sites. Turn on loops when the route diagram benefits from a return path, and use secret rooms only for optional discoveries.
Treat a seed as a version of the generated layout. Write down the seed and settings together, then make a new seed only when you want a different arrangement. Switch visual themes without changing geometry to compare readability. The current tool allows quick cell and symbol edits, then PNG, SVG, and JSON exports. A share URL reproduces generated settings and layout; manual edits belong in your exported file, so save that file separately. For a drainage network beneath a dense market, compare this advice with the practical route: a dry service route beside the channel.
Settings check: generate three seeds with the same room count and compare only the connections. Keep the version where a dry service route beside the channel reads most clearly; a prettier silhouette is less useful if travel becomes confusing.
To test the route and room choices in this guide, open the sewer map generator and compare a few seeds. Keep the version that helps you build a sewer that supports pursuit and exploration.
Review common mistakes
The most common error is random tunnels that do not suggest a drainage system. It often looks acceptable while zoomed in, yet becomes obvious when you trace the route from the entrance. Another error is adding too many symbols before the room network is stable. Remove decorative marks temporarily and see whether walls, paths, and doors still communicate the plan. If not, fix geometry first.
Check every doorway at the map's real use size. A narrow gap may vanish in print; a secret symbol may be too prominent on a player handout. Verify that optional spaces remain optional, that a hidden route does not contain the only required clue, and that the final room is reachable. For encounter maps, also check movement width and sightlines. For exploration maps, check that players can form a useful mental picture. When preparing a drainage network beneath a dense market, test the idea against the actual functions: storm inlet, inspection chamber, junction, overflow vault, and outlet.
Revision check: identify one thing you will remove before adding anything. For a drainage network beneath a dense market, that may be a redundant room, a decorative symbol, or a corridor that duplicates a dry service route beside the channel without creating a new choice.
Prepare the map for screen and print
Export for the medium you will use. If the map is projected or loaded into a virtual tabletop, start with a high-resolution PNG and inspect the grid at actual display scale. If it will be printed, choose a printer-friendly theme and test one page before producing a full set. SVG remains sharp when enlarged, while JSON preserves structured map data for your own notes or future tooling. When preparing a drainage network beneath a dense market, test the idea against the actual functions: storm inlet, inspection chamber, junction, overflow vault, and outlet.
Keep a game-master copy and, when needed, a player copy. The game-master version can retain room numbers and hidden marks; the player version should reveal only what you intend. Put the seed in your notes rather than across the visible play area unless it is useful to the group. Name exported files consistently so a revised map cannot be confused with an older one. The risk to avoid here is random tunnels that do not suggest a drainage system; mark the consequence in your notes before export.
Export check: open the downloaded file, not just the editor preview. Confirm that a marked junction with three water levels, doors, and room numbers remain legible at the actual display or paper size you intend to use.
Test at the table and revise
Before the session, start at the entrance and trace each important room. Confirm that a dry service route beside the channel is navigable and that a marked junction with three water levels appears when your notes say it does. Try one unconventional player choice, such as retreating, bypassing a guarded space, or approaching the final area by a secondary path. The map should support that choice without requiring an emergency rewrite.
After a test, revise only what caused friction. If players could not tell two passages apart, add a landmark or different room function. If the site felt too linear, add a connection with a clear cost. If it took too long, remove a low-value room rather than shrinking every scene. The goal is to build a sewer that supports pursuit and exploration; a map succeeds when it helps the table make and understand choices.
Table check: hand the map to someone who does not know a drainage network beneath a dense market. Ask them to point out the entrance, a secondary route, and a likely destination. Their hesitation reveals layout problems your own familiarity may hide.
Final review questions: Does the map show why storm inlet, inspection chamber, junction, overflow vault, and outlet belong together? Can someone reach the destination without guessing an invisible mandatory secret? Does a dry service route beside the channel create a real alternative? Is a marked junction with three water levels recognizable from the play distance? Have you saved a usable export and the seed? If those answers are clear, stop polishing and prepare the descriptions and consequences that make the location come alive.
Put it into practice
Try the Sewer Map Generator and save the ideas that fit your campaign.